- Advantages of a digger over a shovel
- The operating principle of the device
- Design features
- Optimal metal thickness
- Wheels for a digger
- Connection methods
- Types of potato diggers
- Fan, for walk-behind tractor
- Thunderous
- Conveyor
- Drum type
- Which one is better to choose?
- How to make a homemade potato digger for a walk-behind tractor
- Necessary tools and materials
- Creating a frame
- Welding the mounting rectangle
- Fastening the jumper
- Installation of vertical racks
- Connecting the racks
- Plow and chute board
- Welding the ravine
- Welding the slope board
- Installation of adjusting rods
- Wheel installation
Technological progress is facilitating the development of agriculture at all levels. Industrial-scale harvesting is now fully mechanized. Summer residents and gardeners are beginning to reap the benefits of machinery-assisted harvesting. A potato digger is a tool that helps activate and speed up the potato harvesting process.
Advantages of a digger over a shovel
On medium-sized or small plots, it's common to do farming work yourself. Digging and harvesting are difficult manual labor tasks, requiring the use of available tools. A shovel is the most commonly used tool for cultivating the soil. Digging a plot requires considerable effort.
A shovel is plunged into the soil, physical force is applied, and the soil lump is turned over. To cultivate a few square meters, a significant amount of time and effort is required.
One option for digging the soil or harvesting is to rent a tractor. A small tractor can handle the job several times faster. A problem with renting equipment for gardens or summer cottages is often a lack of space or the inability to access the property due to neighboring buildings.
Industrial potato harvesting equipment is unavailable, so an effective method has been developed to make life easier for gardeners. This device, known as a "potato digger," is used to dig potatoes.
Why is a digger preferable to a shovel:
- saving physical effort (to work with a digger you don’t need to bend periodically and waste energy on pressing);
- increase in operating speed (mechanical speed exceeds the operating speed of a shovel by several times);
- increasing the quality of the work performed (the same depth and equal intervals between furrows make digging more efficient).
The operating principle of the device
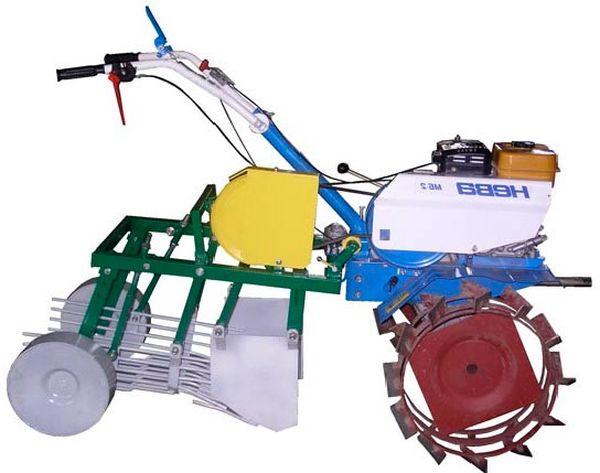
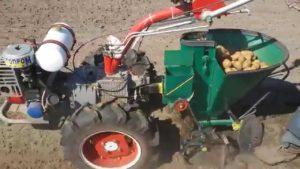
A potato digger can refer to a type of shovel with welded-on parts that make manual labor easier. However, more often, it refers to attachments that are attached to a walk-behind tractor.

A walk-behind tractor is a compact type of tractor based on a single chassis and powered by a diesel or gasoline engine. Small walk-behind tractors are typically purchased for smaller plots. They feature a manual control mode, allowing the entire system to be operated by the gardener.
To adapt a walk-behind tractor for potato harvesting, the lower section is equipped with additional hardware. Many owners attach homemade parts to an industrial walk-behind tractor. The main challenge with this method is selecting and manufacturing durable fasteners.
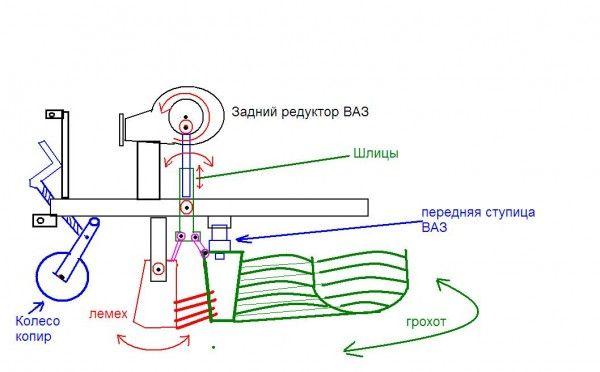
A potato digger in action is a device that, through external force, grabs a portion of the soil, lifts it, and forces it through clamps. The result is plowed soil and potatoes raised to the surface.
Design features
The device has some special features. When attaching attachments to the walk-behind tractor, follow the correct sequence to ensure the necessary mobility of the parts.
Optimal metal thickness
To ensure the fixture doesn't disrupt the alignment, consider the weight and thickness of the metal sheets. Steel pieces should be at least 5 millimeters thick. For rods, use iron or steel with a small diameter, no more than 10-15 mm.
Wheels for a digger
Different types of potato diggers are equipped with wheels or lugs attached to the axle. The lugs are located under the gear wheel. When they move, they pull the gear wheel along with them. The gear wheel, in turn, drives the shaft of the transport device.
Connection methods
The choice of connection method depends on the answer to the question: is there a method for assembling and then disassembling the digger?
- If the device is planned to be disassembled, the parts are connected with bolts.
- If the digger does not require disassembly, then the welding method is chosen.
Both methods are quite reliable.
Types of potato diggers
Diggers come in a variety of models. Manufacturers strive to improve their designs by adding or removing additional features.
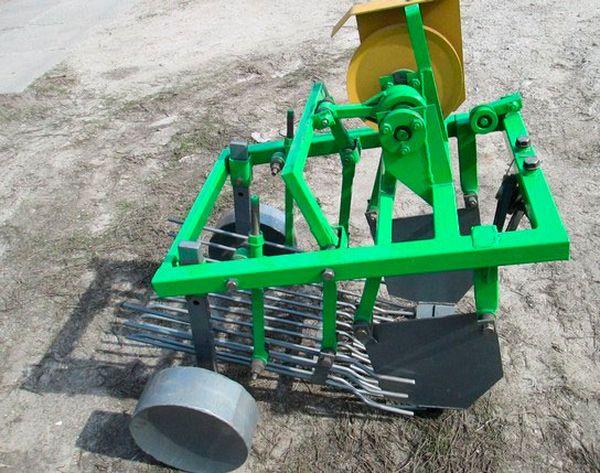
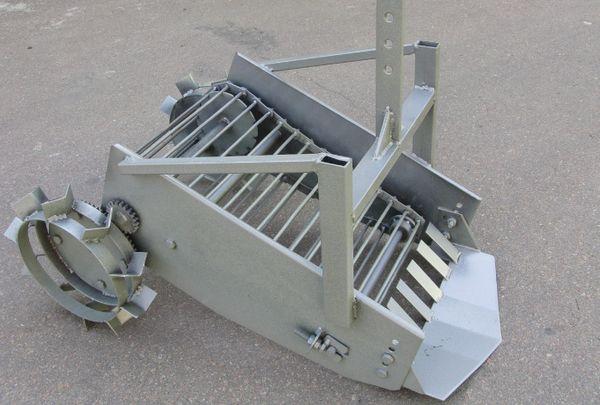
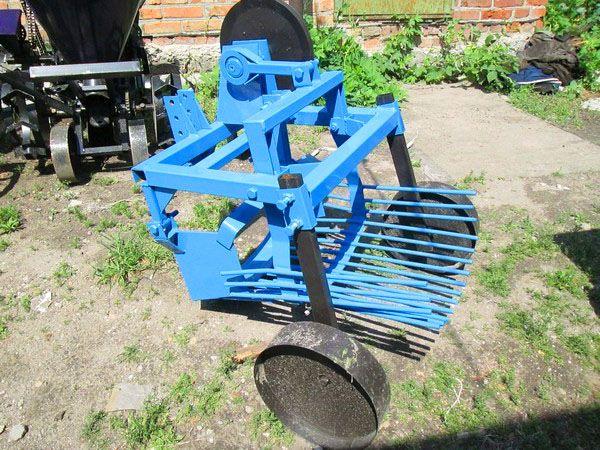
Fan, for walk-behind tractor
This is a device that consists of 3 parts:
- frame;
- suspension;
- vertical rods with fasteners.
This is the simplest model that you can make with your own hands.

Information! Fan-shaped varieties have a significant drawback: about 15 percent of the tubers are lost during harvest.
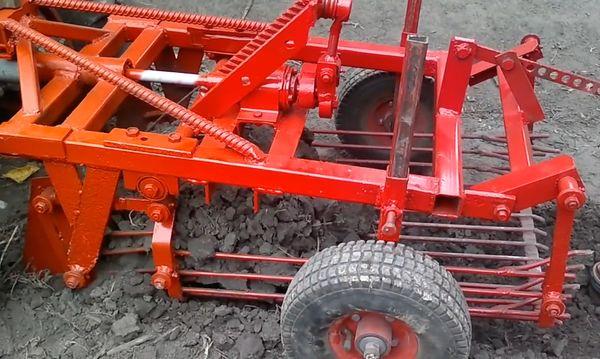
Thunderous
An improved model, similar to a fan-type combine harvester, consists of a share, drive, and vibrating table. Productivity increases severalfold. Tuber harvest quality improves to 98 percent.
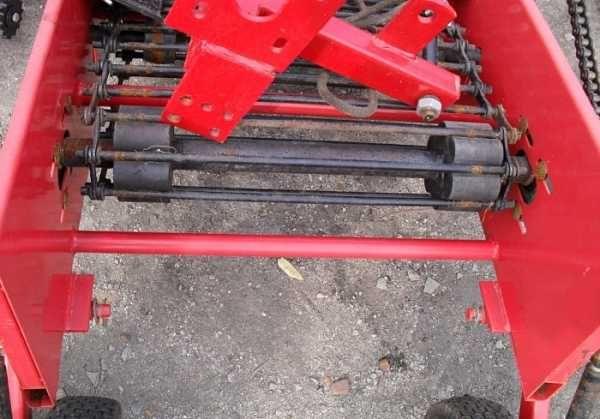
Conveyor
This model is similar to the fan-type model. It is enhanced with additional mechanisms, and the fan-type table is replaced with a belt.
Drum type
The unit is equipped with two-row attachments, is heavier and is designed to be attached to a mini-tractor on medium-sized plots.
Which one is better to choose?
Experts advise choosing a unit based on several parameters:
- size of the plot (for small areas, simple options are chosen);
- the planned harvest volume (if there is not much potato on the plot, then a lightweight mount for a walk-behind tractor that can be controlled manually will do);
- physical capabilities (if it is impossible to walk behind a walk-behind tractor and cultivate the area manually, fully mechanized cultivators are chosen).
How to make a homemade potato digger for a walk-behind tractor
It's common among gardeners and summer residents to make their own potato diggers for walk-behind tractors. With the necessary plans and tools, you can build a canopy for a mini tractor yourself.
Necessary tools and materials
To make a digger, you will need materials and tools for various purposes:
- metal frame as the basis of the structure;
- iron channel or pipe;
- metal sheet and reinforcement;
- fasteners;
- chain;
- metal racks;
- rubber wheels or lugs;
- drum mechanism;
- bolts.
The following equipment will be required for the job:
- welding machine;
- set of keys;
- hacksaw for metal;
- drill.
Creating a frame
The average frame length is 120 centimeters. It is welded from angles and channels.
Welding the mounting rectangle
A square iron tube is divided into four sections. They are welded together, resulting in a rectangular frame. Sharp corners are filed down or cut off with a hacksaw.
Fastening the jumper
The crossbar is attached to the center of the frame. The vertical posts are then installed from this crossbar.
Installation of vertical racks
Step back 5 centimeters from the frame and begin fastening the square profile. Then, fasten the fasteners at intervals of 15 centimeters. The resulting structure begins to resemble an inverted staircase.
Connecting the racks
Thin metal sheets are used for the connections. They are welded at an acute angle to the posts and then joined together.
Plow and chute board
These parts will later be responsible for digging up the tubers and sifting the soil. The board is needed to ensure that the potatoes return to the surface of the soil without becoming lodged in the device's parts.
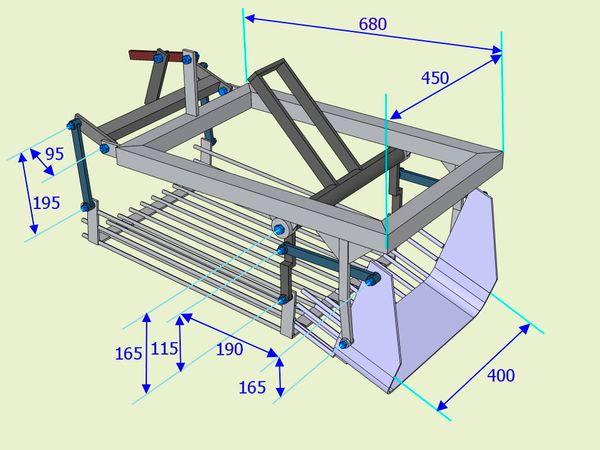
Welding the ravine
Two pieces are cut from a sheet metal at least 3-5 millimeters thick, and the plow is welded together. After the plow is secured to the frame, the blades are hammered to shape them to grip the soil.
Welding the slope board
In a homemade digger, this is rebar welded to the frame in sequence. The diameter of the rebar is 10 millimeters, and the length is no more than 120 centimeters. The bars are welded to the post every 4-5 centimeters.
Installation of adjusting rods
The device requires tie rods to allow for timely adjustment of the slope. This element is considered optional. Typically, tie rods are used only on marshy soils.
Wheel installation
The choice of wheels depends on the type of soil:
- For hard soil, choose diggers with metal lugs;
- For loose soil, rubber wheels from wheelbarrows or carts are suitable.
Information! The wider the wheels, the easier the potato digger will move. However, wide wheels without treads may impair maneuverability.
Building your own potato digger is entirely possible. It will make your work much easier and become an indispensable tool during harvesting.
Related posts:
 Methods for planting and propagating cherries at home
 The best grape varieties for growing in the Urals, planting and care rules in summer
 Growing and caring for hazelnuts in open ground, rules for planting hazelnuts
 Descriptions of the 20 best cherry varieties for the Moscow region, their planting and care
 How to plant grapes step by step, with a description of the process and care
 The best recipes for freezing vegetables at home for the winter
 Description and cultivation of the 15 best cherry plum varieties for the Moscow region, planting and care rules
 What is a potato planter, what is it used for, and how to make one yourself