A homemade tomato trellis built from inexpensive, readily available materials is a convenient and useful addition to any garden. Supporting the bushes serves more than just holding the stems upright. A well-made trellis can also serve as a temporary shelter during frosts and as a decorative element to the garden.
How to calculate the strength of tomato trellises?
Before building a tomato trellis yourself, you need to determine the strength requirements for the structure. The green mass of a single tomato plant can reach up to 3 kg. The combined weight of the fruits, simultaneously filling out and ripening on the stem, often adds approximately the same amount.
When calculating, multiply the number of bushes to be planted along the support by the approximate weight of each (5-6 kg). The material for the homemade support should be selected with this weight in mind.
Permanent structures are most often made of wood or metal pipes. A temporary trellis (for one season) can be made from simple poles or thin beams. If the estimated load (the total weight of the bushes) on a long bed is very high, it would be wise to break the planting into short sections of 2-3 meters.
Temporary trellis made of poles
Depending on the material used, trellis supports are constructed in different ways. For the simplest pole support, an X-shaped structure is suitable:
- 2 long poles are placed at an angle on the sides of the bed, deepening their ends into the soil by 50 cm;
- the upper ends are crossed at a distance of 20-30 cm from the cut;
- The crossing point is tightly wrapped with cord or wire.
The strength of such a support is low, therefore the span length between supports should not exceed 2 m.
Place horizontal poles into the forks at the top of the support structures. The trellis will be stronger if these pieces are tied to the supporting elements. Attach cords to the horizontal beams for tying up the bushes that will be planted beneath the trellis.
Stationary structures for tying up vegetables
In a small garden, it's a good idea to install trellises that can be used for many years. If you practice crop rotation and move vegetable crops from one location to another each season, you can use a trellis to garters for cucumbers and peas, pumpkins, and other plants that require support. The posts don't interfere with low-growing crops, and if necessary, they can be used to stretch plastic or lutrasil.
To construct supports for permanent trellises, use a 5x5 cm or thicker beam, as well as a metal pipe with a diameter of 5-7 cm. In addition, you will need:
- shovel;
- cord or wire;
- crushed stone and cement;
- building level;
- fastening materials.
Install vertical posts at the opposite ends of each ridge. For security, dig them to a depth of approximately 70 cm, and fill the hole around the posts with crushed stone mixed with dry cement in a 4:1 ratio. Compact the backfill. When installing the posts, check their verticality using a spirit level.
If the bed length exceeds 3 m, additional supports will be required. The distance between trellis posts should be 2-3 m. They are installed using the same principle as the outer elements.
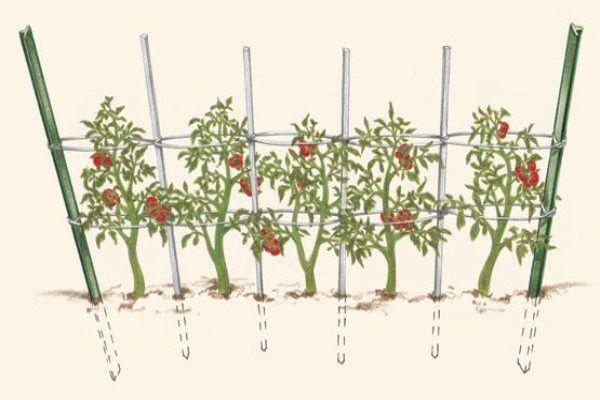
After this, horizontal elements are attached to the trellis. The simplest method is to attach a crossbar to the top of the posts, to which you can tie cords for tying or attach a large-mesh plastic net. However, tomatoes can also be grown on a trellis in open ground using more complex and attractive structures:
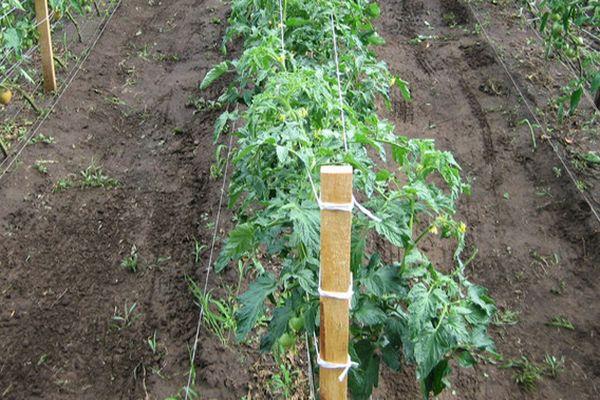
- Attach short pieces of timber or pipe to the vertical posts, positioning them perpendicular to the bed axis. As the tomatoes grow, horizontal cords are pulled between the ends of the posts to support the tied stems. Depending on your preferences for ease of care, the posts can be made equal in length (with the stems tied vertically, as in the photo), or they can be made to decrease in height up or down the posts (with the tomatoes leaning inward or outward from the center of the bed).
- An interesting variation on the tomato support described above. When planting, the bushes are positioned within a rectangle formed by horizontal beams and cords. In northern regions, this trellis quickly protects young plants from spring cold snaps or hail. Simply drape plastic film or lutrasil over a tier of cords stretched above the tops of the seedlings and secure it with clothespins. In the fall, this cover will help the last tomatoes ripen.
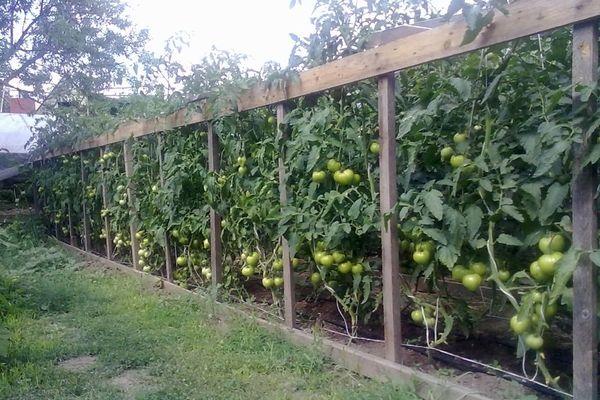
- Plastic mesh (commonly used for fencing) can be used for tying up the tomatoes. In this case, a horizontal beam is attached over the posts along the entire bed. The mesh is tied to this beam, securing its bottom edge with wire hooks driven into the ground. To secure the bottom edge, you can install an additional bar 15-20 cm above the ground. The tomatoes are tied directly to the mesh.
- You can attach cords to the horizontal beam and tie the tomatoes to them, like on a trellis made of poles.
Take a look Also

To ensure that permanent trellises last a long time and look aesthetically pleasing, the wood is painted or varnished, and the metal pipes are primed with special compounds to protect against corrosion.
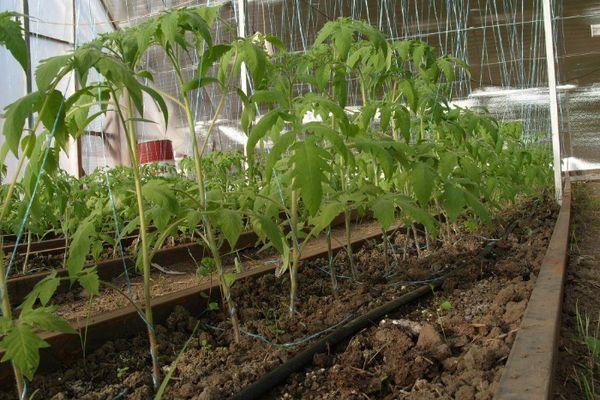
Trellis in the greenhouse
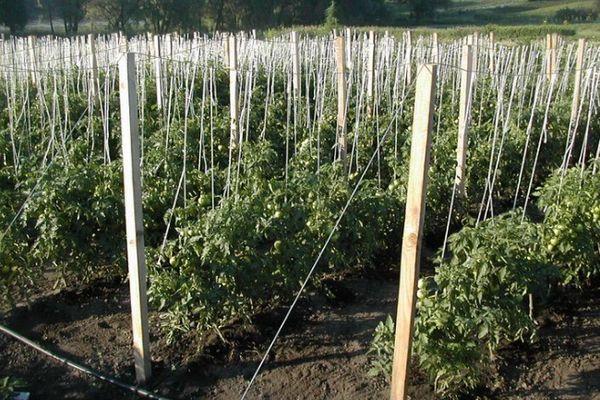
When growing tomatoes indoors, indeterminate varieties are most often used. They grow without limit and produce higher yields per unit area. However, greenhouse heights rarely exceed 2 meters. Some gardeners build a simple trellis in the greenhouse, using wire stretched between posts with vertical cords suspended from them for support. Once the plant reaches the wire, it is slung over the support and no longer needs to be tied.
With prolonged fruiting, this method leads to stem breakage under the weight of new ovaries. However, experienced gardeners have improved the greenhouse trellis:
- A mesh strip is stretched between the posts at a height of 50-70 cm above the ground to form a shelf. Tomatoes are planted along the trellis.
- When seedlings need support, measure out a length of cord. Its length is equal to the height of the trellis (e.g., 180 cm) plus any additional length the tomato plant can grow beyond this height. Any excess cord should be wound around a homemade hook made from stiff wire.
- The hooks are hung on the trellis wire, and the free ends of the cords are secured to the ground. Until the tomatoes reach the top of the trellis, they are tied up in the usual way. When the tops of the bushes begin to outgrow the trellis, the rope, previously wound onto the hook, is released by 20-25 cm. The tomato stem is then lowered onto the net stretched below, and the hook is moved along the wire. The remaining bushes are treated in the same manner.
The advantage of this method is that the stems of tall tomatoes don't break under the weight of the fruit, allowing gardeners to continue harvesting until persistent cold weather sets in. In heated greenhouses, this method significantly extends the tomato growing season.
Take a look Also
How to tie tomatoes to a support?
Tomatoes can be planted in a trellis-mounted bed in one or two parallel rows. In the latter case, the distance between them should be at least 40 cm. The bushes are tied to the strings when the seedlings reach 20-25 cm in height.
It's not recommended to secure the string to the tomato plant stem; a better approach is to drive in a separate stake and attach the lower end to it. Tie the plant with a soft material (a rag, a bast cloth, or a strip from a used bag), placing the loop under the base of a leaf. Cross the ends of the tying material and then tie them to the trellis string. This will enclose the stem in a loose ring of soft material. It won't break or be damaged even in strong winds.
The next staking is done when the plant forms a cluster with ovaries. The loop should support the bush just below this cluster. This loop is made in the same way as the previous one. As the stem grows, it is tied under each newly forming inflorescence, and if necessary, under the leaves between the clusters.
Growing tomatoes on a trellis allows for increased airflow and light in the lower planting zone. This protects tomatoes from fungal diseases and helps produce a higher yield.
Related posts:
 How to make a cucumber trellis with your own hands from scrap materials
 Step-by-step instructions on how to make a grape trellis yourself
 The best eggplant varieties for growing in a polycarbonate greenhouse: planting and care
 The best ways and methods for properly covering grapes for the winter
 Top 40 DIY New Year's Baking Recipes for 2020
 Instructions for creating a DIY blackberry trellis
 Is it possible to soak treated cucumber seeds before planting and how to do it correctly?
 When and how to prune blackberries: timing and instructions for beginners